September 05, 2014

Enable the Hidden Administrator Account on Windows 7, 8 & 8.1

Windows automatically creates an Administrator account with elevated privileges during the installation process. We mostly need to access it to perform tasks limited only to system Administrators. These are tasks performing which result in the UAC asking for confirmation even if you are using an account with administrative privileges. The elevated Administrator account is disabled by default in Windows 7, Windows 8, Windows 8.1 and Windows Vista.

To activate it, you need to use any one of the the following simple methods.

Important: It is recommended to only use this account for troubleshooting purposes and disable it once the task is complete. Even if you do leave it enabled, protect it with a strong password to prevent unauthorized access. 
Enable/ Disable the Administrator Account Using the Elevated Command Prompt

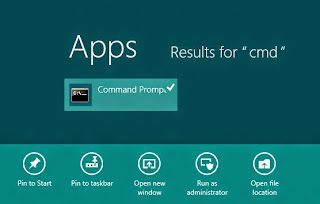
Enable Administrator Account1. If you are on Windows 7, go to Start>Programs>Accessories and right click on Command Prompt and select Run as Administrator. Windows 8 and 8.1 users, search for CMD on the Start screen and in the results returned, right click on Command Prompt and select Run as Administrator. 

2. In the Command Prompt, type and execute the following command.

net user administrator /active:yes
3. You should see a message indicating that the command was completed successfully.

4. Upon logging out, you will see the Administrator account available on the login screen.

Disable the built-in Administrator account

To disable the Administrator account, type execute the following command in Step 2.

net user administrator /active:no
This will disable the Administrator account and it will no longer appear on the login screen.
Enable the Administrator account using the Local Users and Groups Manager

Enable Administrator in Windows 7
1. Press Windows key+R to open the Run dialog box.

2. In it, type lusrmgr.msc and press Enter. This will start the Local Users and Groups Manager. 

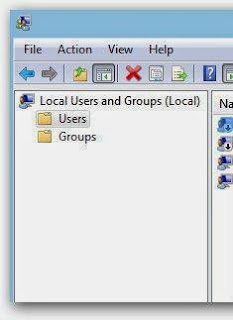
3. In the Local Users and Groups Manager, click on Users in the left hand pane.

4. Then, in the work area on the right side, double click on Administrator.

5. In the following dialog box, uncheck the Account is disabled option and click OK.

6. Administrator account will be immediately available on the login screen. 

To disable the Administrator account, check the "Account is disabled" option in step 5.

This method will only work if you are using Professional or Enterprise editions of Windows 7 and Windows 8(.1). If you are using home and basic versions of these operating systems, this method will not work for you as Local Users and Groups manager is not available on them.
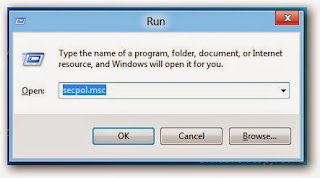
Enable or Disable the Administrator account using the Local Security Policy Editor

1. Press Windows key+R to open the Run dialog box. 
Enable Administrator in Windows 8 and 8.1

2. Type secpol.msc and press Enter. This will start the Local Security Policy Editor.

3. In the Local Security Policy Editor, navigate to Local Policies\Security Options.

4. In the work area on the right side, double click "Accounts: Administrator account status."

5. In the following dialog box, encircle Enable or Disable to respectively enable and disable the Administrator account.

6. Press OK. Log off to the login screen to see the Administrator account.

Local Security Policy Editor is not available on home editions of Windows.

Lock a Folder With Password Using Free Folder Protector - By tweakandtrick.com

All of us have some files and folders that we consider private. They can be anything from our business documents to pictures of friends and family. These are files that we don't want other people using our computer to know about. As Windows offers no way to protect our private information, most of us get in awkward situations when these files are discovered by unwanted people.

Lock Folder Windows
Surely, you can store this information in a hidden folder. The only problem is that anyone can easily search the contents of a hidden folder using Windows Search itself.

The only viable solution is storing this content in a password protected folder so that only those people knowing the password of the folder can access it. There are many folder locking programs available online but the problem is that most of the good ones are paid. Even if you do manage to get a good free one, you will be looked at suspiciously when people see a folder locker in the list of your installed programs.

If you too find yourself in a similar situation, you can try Folder Protector, a password protector for Windows folders that is not only free but is also portable meaning that it does not need to be installed. Just click on the exe file and the program will start running. I have created this program based on suggestions and feature requests that I have received by email over the last two years.

Folder Protector

Folder Protector offers each user a protected folder that can only be opened by entering the password in FolderProtector. Unlike most security programs, Folder Protector is small in size (nearly 58KB) and does not show the folder that it is protecting. This gives an additional advantage that people who don't know the password do not have a target to try and hack their way into. As the software is portable, you can hide it or even delete it after protecting your folder and no one will have a clue that it was used. Then whenever you need to access protected files, you can re-download the program from this page, enter the password and access your protected files.

Download Folder Protector

Download for Windows 8, Windows 7 and Windows Vista

Download for Windows XP

This program uses a simple method to lock files and should not be used to protect truly sensitive information. It is best to encrypt that kind of information.

How to use Folder Protector?
When you run Folder Protector for the first time, the program will ask you for a password that you want to use. Enter a password that you can remember as this will be the password to your protected folder.

Lock Folder With Password

After entering the password, the program will open a folder named SecuredFILES. This is your protected folder. You can add all your private files in this folder. This folder is located at the Desktop. After adding all your files, you may close this folder. 

Then, you can use the menu in the program to lock your folder. To lock the folder, type lock as your action. After successfully locking the folder, FolderProtector will display that the folder is locked.

Free Folder Lock

Unlocking the protected folder is easy. Just type unlock as your action. Then the program will ask you to enter your password. Upon successfully entering the password, the program will display the contents of your protected folder.

Changing the Password: Just type change as your action. The program will ask you for your current password. Upon successful entry of the current password, the program will ask for your new password and change it instantly.

Acknowledgment: This software has been made possible only through the suggestions of readers of this blog, especially Ernell Albert Galido for his idea of using a menu based interface.

Windows Compatibility: This program has been successfully tested on Windows 8.1, Windows 8, Windows 7, Windows Vista and Windows XP.

Make your Computer Welcome You

Do you watch movies? Have you always loved the way how Computers in movies welcome their users by calling out their names? I bet that you too would want to know how you can achieve similar results on your PC and have a computer said welcome. 

Then you are at the right place, this article describes exactly how you can make your computer welcome you like this.

With this trick, you can make your Computer welcome you in its computerized voice. You can make your Windows based computer say "Welcome to your PC, Username."

Make Windows Greet you with a Custom Voice Message at Startup

To use this trick, follow the instructions given below:-

  1. Click on Start. Navigate to All Programs, Accessories and Notepad.
  2. Copy and paste the exact code given below.
Dim speaks, speech
speaks="Welcome to your PC, Username"
Set speech=CreateObject("sapi.spvoice")
speech.Speak speaks
     3.  Replace Username with your own name. 
     4.  Click on File Menu, Save As, select All Types in Save as Type option, and save the file as Welcome.vbs or "*.vbs".
     5.  Copy the saved file. 
     6.  Navigate to C:\Documents and Settings\All Users\Start Menu\Programs\Startup (in Windows XP) and to C:\Users\ {User-Name}\AppData\Roaming\Microsoft\Windows\Start Menu\Programs\Startup (in Windows 8, Windows 7 and Windows Vista) if C: is your System drive. AppData is a hidden folder. So, you will need to select showing hidden folders in Folder options to locate it.
     7.  Paste the file.


 Make your Computer Welcome you at startup

Now when the next time you start your computer, Windows will welcome you in its own computerized voice. 

Note: For best results, it is recommended to change sound scheme to No Sounds.
You can change the sound scheme to No Sounds by following the steps given below:-

  1. Go to Control Panel.
  2. Then click on Switch to Classic View.
  3. Then Click on Sounds and Audio Devices.
  4. Then Click on the Sounds Tab.
  5. Select No Sounds from the Sound Scheme option.
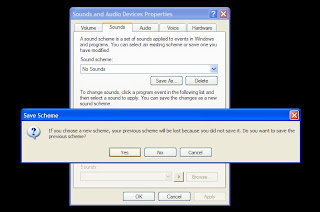
  6. If you wish to save your Previous Sound Scheme, you can save it by clicking Yes in the popup menu.
  7. Click on OK.
Change Sound Scheme to No Sounds

Try it yourself to see how it works. In my personal opinion, this is an excellent trick. Whenever I start my PC in front of anybody and the PC welcomes me, the fellow is left wondering how brilliant a computer do I have.

April 10, 2013

Create a Shutdown Shortcut that Looks like a Folder


I guess this is the most easiest and simplest ways between those computer pranks
  • create a shortcut to “shutdown.exe ” on the desktop
  • change the icon to a regular folder
If you want to changer the time For The shutdown
shutdown -s -t 1925000 -c “System error: overloaded porn folder”
If the victim Is using Windows Xp  ,the feeling is respectable and spectacular,and you can have many fun with the shutdown time… on Windows 7  it’s a bit different The sign won’t be obvious but still see something that will confuse the victim .
Note: on Windows 7 or Vista you’d also need to disable UAC or else they’ll see a prompt.

Making PC type the word “SPACE” hitting the space bar


This Prank Will drive Your Friend Crazy Trying To figure What is going on
The trick is actually pretty simple it’s all about creating and autohotkey :
  • Create a new autohotkey script
  • add those two line
#NoTrayIcon
*Space::Send,SPACE
  • save it
  • right click on the script and compile it
  • watch the fun !!

how to Give Access to Your Gmail Account Without Sharing Password


You might that this a bit strange title
but there is sometimes when you can be absent or in some vacation and you want from a friend to login into your gmail account but without having to give him the password  For more security
And For this purpose, Google has managed to provided a feature that will help you add guests to your Gmail and give all the authorities in the management of your Gmail account or as as well as some other Google services but without the possibility of penetration /Hacking and changeyour password change.
it’s a very simple way simply enter your Google account click on Settings as in the picture
How to Give Access to Your Gmail Account Without Sharing Password
Then go to the accounts and import and click on add another account After you enter the Gmail guest account,
add another account how to Give Access to Your Gmail Account Without Sharing Password
Message will reach the other side for the acceptance of the addition, where after acceptance must wait approximately 30 minutes in order to allow him to manage your account, so just by clicking on the image visitor (guest) in the mail box the choose to log on to your account,
delegated email access how to Give Access to Your Gmail Account Without Sharing Password
So the guest will be able to read and reply to messages in addition to managing other Google services associated with your account.

April 04, 2013

Show Your Name In the System Clock IN WINDOWS 7


This tip is absolutely and completely useless, and will even make applications that depend on timestamps have issues. It’s mostly just to be used as a cool trick you can show off to your friends, so we’re going to show you how it works.
The way this trick works is by modifying the regional settings for the time format. Instead of using just AM or PM, you can put up to 12 characters of text in that field.
image
Start by opening Regional and Language Options from the start menu search box or the control panel.
On the Formats tab you’ll see the “Customize this format” button, which you’ll need to choose.
Select the Time tab, and then here’s where we can make whatever settings we want.
I chose to set mine to “AM – Geek” so I could still see AM or PM, but you can choose any 12 characters for either field. Keep in mind that the PM symbol is only going to display during the “PM” hours.
This does change more than just the displayed clock, so I’d advise not using this on a computer you do actual work on. Using the F5 key in notepad shows the “Geek” text as well:
 
It’s one of those things that’s interesting to know… just not very useful. It does work in XP as well.

**Please post your feedback about this post..

THANK YOU.

January 31, 2013

Install windows OS from USB


If you often try out new versions of Windows, then WiNToBootic can be an excellent program to have saved on your hard disk. This free program has the sole function of creating boot disks using ISO images. WiNToBootic is a very simple program to use, lightweight and beautiful. Only these qualities are enough to recommend it a test. However, during our test, the application was extremely quick and functional. The conversion of ISO images has been carried out within a few minutes and the program could work also with Windows 8 Consumer Preview. All information is shown clearly on the screen of the software, and you do not need to scour hidden menus or options to accomplish a simple task. WiNToBootic has many other notable features too including that it is a portable software so you can carry it to anywhere you want. Anyway, if you need a free program for creating working and functional bootable flash drives, then the WiNToBootic can the perfect choice. However, unlike other alternatives, WiNToBootic does not accept DVDs or CDs as storage media. The program is specifically designed to work with USB drives. More to read.
WiNToBootic is a small and portable tool of only 600KB. As being portable, you don’t need to separately install it on your system to use. Just download and double-click on the executable file to run. The UI of WiNToBootic simple and completely understandable. Just click on the Click Herebutton to select the ISO file of your OS and then select preferred flash drive. Mark on Quick Format if you want to perform a quick format before creating Bootable device. Once done, just click on Do It.
WiNToBootic Easily Create Bootable Flash Drive For Any Windows OS With Bootloader Flash [Windows] (2)
WiNToBootic the automatically flashes the bootloader, extracts the ISO file and then place it on the flash drive. Note that it might take sometime depending on your OS version and Hardware resource. Once it finishes, you will be able to use that bootable flash media anywhere.
WiNToBootic Easily Create Bootable Flash Drive For Any Windows OS With Bootloader Flash [Windows] (1)
During our test by ABC Trick Lab, we used a 32-Bit version of Windows 8 Consumer Preview to create a bootable Pen-Drive. WiNToBootic was able to easily and successfully create a bootable media pretty fast. The developer notes that WiNToBootic will only work for creating Windows 7/Windows 8/Windows Vista/Windows 2008 and Windows PE2/PE3.


November 27, 2012

November 20, 2012

Facebook chat emoticons for messages

Karthik-compvirus.bolgspot.in


[[100001256102462]]  Lamp

[[167359756658519]]  No

[[142670085793927]]  MOG

[[168040846586189]]  Feel like a sir

[[100002727365206]]  Challenge accepted

[[100002752520227]]  Okay face

[[129627277060203]]  Poker face

[[224812970902314]]  Okay face

[[98438140742]]  Socially awkward penguin

[[FUUUOFFICIAL]]  Rage face

[[NotBaad]]  Not Bad

[[171108522930776]]  FB Troll face

[[143220739082110]]  ARE YOU KIDDING ME

[[169919399735055]]  Not bad Obama

[[211782832186415]]  Me Gusta

[[170815706323196]]  Cereal Guy

[[168456309878025]]  LOL Face

[[167359756658519]]  NO Guy

[[218595638164996]]  Yao Ming

[[224812970902314]]  Derp

[[192644604154319]]  Derpina

[[177903015598419]]  Forever Alone

[[20531316728]]  Facebook

[[271286126262930]]  ladygaga

[[121171241234393]]  ChaDYaaR1

[[132312073477487]]  fbPakistan

[[202929289769637]]  ShareColors

[[4]] zuck

[[14696440021]]   firefox

[[321662419491]]   googlechrome

November 17, 2012

Improve Your PC Performance with RegClean Pro v6.2 Full Version with Serial key


As the name indicates RegClean Pro that it clean your total computer and scratches the  incompatible and insufficient data and other virus issues which will harm to your computer .By this RegClean Pro you can able to boost your pc performance and Improve your PC Performance by cleaning the all Issues and registry errors in your computer.RegClean Pro  download Contains No Malware and virus issues.


Features :-

  • Improve your whole system speed .
  • Improve your PC or laptop Performance .
  • It Cleans your Whole Computer for all types of errors and fix the errors.
  • It Fixes the all Registry Errors .
  • RegClean Pro will Fix the Invalid and useless Registry errors .
  • It having the option of Defrag Registry to Defrag and Compact the Registry.
  • RegClean Pro  Prevents the  system crashes and BSODs.
  • It Improves your whole pc performance drastically.
  • By using this it cleans your PC regularly and fix the registry errors regularly so it having the Features of  stable system and safe and reliable.


Offer :-


By using this Free Version you can able to fix 15 errors only . So you can buy this software to get the serial key for this . Actually  RegClean Pro v 6.2 cost is USD 29.95 for the Professional Full Version.
But TechnoHackzs Provides Serial Key For this software For Free .The Offer Provided by us .
After the Installation Click on the Register Now Button and enter the Serial Key As I Provided in the Below Image . Choose any one key ....all the serial keys are perfectly working.


Join our social network sites Google+ , Facebook ,Twitter  for Instant Updates

Download :-

This Software can be downloaded through the below link ( From thier Official Website )
                                        Download Regclean Pro .

UltraIso Full version free download


Hello guys today i am showing u a powerful iso burning and writing software it's create iso images burn to cd's DvD's and even usb flash drives and Create and rip image file from Dvd and cd's.. 


Features :-

  • By using this Ultra ISO  you can easily Create a ISO File.
  • Editing Of ISO File is Simple.
  • Extract files from the ISO File.
  • By this you can easily Burn ISO File , Mount ISO File , and Make Audio Disc 
  • It can be Supports to all Image Formats .
  • By using of the Power ISO we can Burn  the Audio CD from MP3, FLAC, APE, WMA, or BIN files.  
  • By this tool We can  Rip Audio CD to MP3, FLAC, APE, WMA, or BIN files etc .
  • By this tool you can easily edit the ISO File Image Directly.
  • Power ISO Allows the Creating Of Bootable USB Drive .
  • It Can Be Supported to all Operating Systems and also can be supported to 32 bit & 64 bit .


Steps to install:-


1.Install like a default application
2.Copy the serial key and name to the registration area.
3.Restart it and click help about see it's pro version..
4.Enjoy cheers!!!.


Name: UW-Madison Executive Education
Code: 1519-E287-A828-A24A


Requirements:- Windows xp,Windows 7.


DOWNLOAD :- UltraIso Full Free

September 21, 2012

MAKE YOUR OWN PROXY SERVER AND ACCESS BLOCKED SITES FROM SCHOOL/COLLEGE/OFFICE

Hello Friends,

Most schools, Colleges and Offices enable a firewall to restrict you from visiting some websites, images or other material. Mostly what people do to use the blocked sites.....they search for any proxy server to open those sites.... This is good way....

But what if your schools, Colleges and Offices Block those proxy server also?
I know u will search 4 another one....

But how it would be if you make your own proxy server to access any site from any where....... Interesting na....

Yes, U can make your own Proxy Server just in 10 Min....

Follow These Steps to make your Own Proxy Server...

1. Download the following software and install it 
Download Python
Download Google App Engine SDK for Python
Download Proxy server Files 


2. Go to appengine.google.com and sign-in using your Google Account. Click on “Create an Application” button, select Country and insert ur mobile no. Google will send a verification code via SMS to your mobile phone number. Type the code and Press send. 


3. After Verification, type any proxy server name in Application Identifier and Application Title.... as shown below


4.Now Start the Google App Engine Launcher > Edit > Preferences and Fill details as Shown


5. Now Go to File > Add existing Application and in application path give path of Folder Proxy... that was downloaded in step 1..... and click ADD.
Note: The Proxy files are zipped.... Extract them to same folder before browsing here.


6. Now Press Edit as shown above.... and replace “d-accord-proxy server” with the ID (sub-domain) that you reserved in Step 3


7. Now Press Deploy.... wait for 2 minutes..... and your online proxy server is now ready for use.

Now You can Access Any site from any where Using your own proxy server.....